Coatings, Chroma and Density
In a previous post “How to Make an Inkjet Sandwich” I talked about the potential different ways that ink can react to a substrate when used in combination with other fluids such as primers or post-coatings. Those interactions make it critical to optimize all the fluids for your entire process, prior to linearization and profiling, to avoid print defects such as color to color bleed and coalescence.
Guess what? Pre-coat and post coatings can also change the chroma and density of an ink. Even more reason to look at all the fluids in the process right up front.
When applying a pre-coat by jetting or anilox, the fluid absorption rate into the paper stock is not completely even across the sheet because the paper stock porosity is not even. This is actually good for inkjet printing, as the paper porosity is needed to help fluids such as pre-coating and inks to dry. Unfortunately, this drying difference can cause color shifts which are an issue when trying to stay within a low dE color tolerance.

The amount of pre-coating applied, and the level it sits at within the paper formation, determines the dry/absorption rate. The dry/absorption rate can change an ink’s density. The amount of ink on the surface will affect the color chroma (purity), but more ink on the surface requires faster drying. So, in most cases when an ink stays higher on a paper’s surface, your overall print speed must be reduced to allow the ink to dry or the amount of ink must be reduced for the same reason. You can reduce your through put for higher quality (more ink), or limit the amount of ink and reduce the overall color gamut (quality). One more time: more ink, more quality, less speed 0r less ink, less quality more speed. That is usually the trade-off.
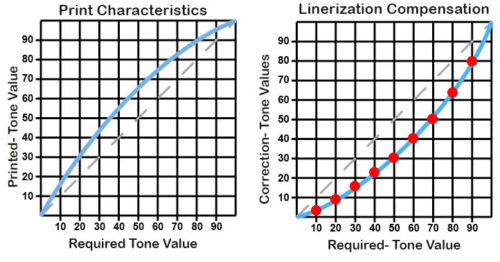
Post coating applications can also cause a printed dot to become slightly larger. This is called rewetting. If an ink is not dry before a post coat is applied, printed drops can spread affecting your over all highlight, mid-tones and shadows. Respectively, dot gain can cause up to a 10% over all gain throughout color curves. This can cause image highlights to become grainy and mid-tones to darken as drops begin to bridge.

A few inkjet devices conduct linearization as part of the calibration/uniformity process prior to any post coat application. If your machine follows this process, be sure for your color profiling step you include linearization rather than just creating a profile from a printed patch set, since adding post coating can change dot circularity and size.
Controlling ink spread is one of the most important aspects of a good color profiling workflow. As I have mentioned many times, controlling the ink is the first step to creating great inkjet color and print quality regardless of the substrate you are using.
See why establishing machine, ink and fluid settings previous to profiling is so important?
As each fluid is applied onto the next, the characteristics of each ink color can change. Ensuring that you linearize and profile to a standardized process based on your inkjet device is important to optimal color control.
Best practice for papers which are used with and without different coatings is to profile each fluid configuration separately to ensure you are standardizing color and print quality effectively.
If your process is standardized, your color will be too.
If you are having good experiences with particular pre or post-coatings, I’d like to hear from you. Drop me a line at Mary@inkjetinsight.com
